This is equivalent to saying that to fail with advantage, you must fail at two rolls instead of just one. Similarly, to succeed with disadvantage, you must succeed at two rolls instead of just one. We'll look at it this way, because it's easy to calculate the probabilities. A direct computation might have us first compute the distribution of the higher of 2d20 for advantage (and the lower for disadvantage) and then computing the probability that the result is above a certain threshold, which is a little more computationally intensive and, more importantly, less intuitive.
Let's consider advantage first. Instead of first taking the higher of the two dice, we can first compare the individual dice against the target number. For the higher die to be a hit, at least one of the two dice must be a hit. If one die is a hit, we don't care about the other one anymore (well, except for rolling a 20); if the other die is higher then it also succeeds and if it is lower then we don't use it. Conversely, for the higher die to be a miss, then both dice must miss. Since the two die rolls are independent, then we can write the previous statement as,
\begin{align}
P(\text{miss with advantage}) = P(\text{miss}) \cdot P(\text{miss}).
\end{align}
There are only two possibilities, hitting and missing, so
\begin{align}
P(\text{miss}) + P(\text{hit}) = 1.
\end{align}
Using this we can express the probability of hitting with advantage.
\begin{align}
1 - P(\text{hit with advantage}) &= \left(1 - P(\text{hit}) \right) \cdot \left(1 - P(\text{hit}) \right)
\end{align}
In order to make this easier to write, let's make a substitution $p = P(\text{hit})$.
\begin{align}
1 - P(\text{hit with advantage}) &= \left(1 - p \right) \cdot \left(1 - p) \right) \\
P(\text{hit with advantage}) &= 1 - (1 - 2 p + p^2) \\
P(\text{hit with advantage}) &= 2p - p^2
\end{align}
This last equation looks a little bit funny, but we can rewrite it more meaningfully.
\begin{align}
P(\text{hit with advantage}) &= p + \left (1-p\right ) \cdot p
\end{align}
The probability of hitting with advantage is the probability of hitting (without advantage) plus the probability of missing times the probability of hitting. Note that this is not equal to the probability that you hit with the first die plus the probability that you hit with the second die. The cases where you hit with the second die include cases where you also hit with the first die. We need to make sure that we don't double count, which is why the second addend (one of the things being added) has the term $(1-p)$.
Everything gets turned around for disadvantage, but that actually makes it much easier to express the probability of hitting, since you have to hit with both dice in order to hit with disadvantage.
\begin{align}
P(\text{hit with disadvantage}) &= p^2
\end{align}
Using these equations, we can compute the probability of hitting with advantage and disadvantage for any effective target number. I've plotted the results below. The shapes of the plots are quite interesting, particularly the bowing. The little jut for a target number of 1 is simply due to the rule that a 1 always misses.
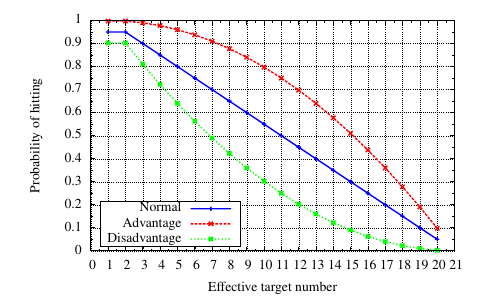 |
| Attacking with advantage and disadvantage in D&D |
It can be helpful to visualize this by drawing the probability space as a square. The two dimensions of the square represent the two die rolls. The areas represent the various probabilities with advantage or disadvantage. We square goes from the origin $(0, 0)$ to $(1, 1$). The horizontal axis represents the probability of hitting with the first die, the vertical with the second. We can draw a vertical line at $p$ to represent the probability of hitting with the first die. (Technically, this is a line segment, because it doesn't keep going in both directions, but colloquially we'd call it a line and we're not really focused on the geometry here, so I'm sticking with just line.) The part of the square to the left of the line represents the outcomes when the roll of the first die is high enough to hit. The area of this part of the square is equal to the probability that the first die hits. Similarly, we can draw a horizontal line at $p$ to represent the probability of hitting with the second die. The area below this line is equal to the probability of hitting with the second die. With these two lines, we've broken up the square into four smaller rectangles. We can label these $A$, $B$, $C$, and $D$.
\begin{array}{c|c|c|c}
\text{Event} & \text{Hit with first die?} & \text{Hit with second die?} & \text{Probability} \\ \hline
A & \text{Yes} & \text{No} & p \cdot \left(1 - p\right ) \\
B & \text{No} & \text{No} & \left(1 - p \right )^2\\
C & \text{Yes} & \text{Yes} & p^2\\
D & \text{No} & \text{Yes} & \left(1 - p\right ) \cdot p
\end{array}
We can treat these as both areas and probability events. The probability of hitting with disadvantage corresponds to the area labeled $C$.
\begin{align}
P(\text{hit with disadvantage}) &= P(C) \\
P(\text{hit with disadvantage}) &= p^2
\end{align}
The probability of hitting with advantage corresponds to the combined area of $A$, $C$, and $D$. This is also called the union of $A$, $C$, and $D$: $A\cup C \cup D$.
\begin{align}
P(\text{hit with advantage}) &= P(A \cup C \cup D) \\
P(\text{hit with advantage}) &= P(A) + P(C) + P(D)
\end{align}
We can perform the substitution in the previous equation because the three areas are non-overlapping, representing that the events are disjoint (mutually exclusive).
\begin{align}
P(\text{hit with advantage}) &= \underbrace{p \cdot \left(1 - p\right )}_{P(A)} + \underbrace{p^2}_{P(C)} + \underbrace{\left(1 - p\right ) \cdot p}_{P(D)} \\
&= p \cdot \left(1 - p\right ) + p \cdot \underbrace{\left ( p + (1-p) \right )}_{1} \\
&= p + p \cdot \left(1 - p\right )
\end{align}
These are, of course, the same probabilities we derived earlier.
First, let's consider the case when our effective target number is 11, such that the probability of hitting on a normal attack is 0.5, or 50%. In this case all four of these rectangles are equal in area. The probability of hitting with advantage is 0.75, while the probability with disadvantage is only 0.25.
Note, we could have drawn this square using the effective target numbers, but then things would be backwards and more specific to this problem. I figured that the more general case would be more useful.
No comments:
Post a Comment